|
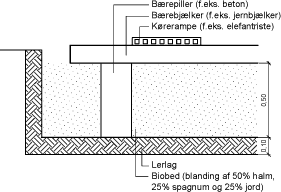
Udarbejdelse af praktiske retningslinier for forebyggelse af forurening af små vandforsyninger i forbindelse med håndtering af pesticider i landbruget Bilag 6 Biobede. Vejledning fra Danmark og Sverige og byggevejledning for det danske forsøgsbiobedForslag til byggeblad for et biobed
Biobädd vid sprutfyllning-Säker hantering hela vägen-
Biobädd, exempel:Sjöstorps Norregård 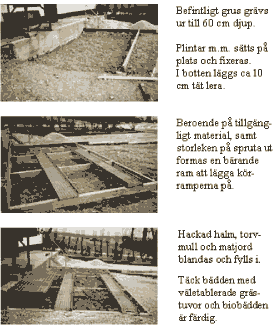
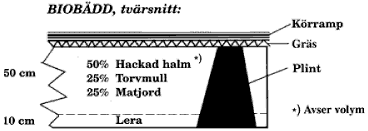
Biobädd, principskiss:
-Klart- Erfarenheter från användning av biobädden
Biobäddar har nu varit i bruk ett par år på flera av Odling i balans pilotgårdar. Det som introducerades som en intressant idé har visat sig fungera utmärkt när det gäller att eliminera riskerna i samband med påfyllning och rengöring av sprututrustningen. Flera av bäddarna har blivit testade av Dr Lennart Torstensson SLU som är verksam vid Institutionen för mikrobiologi, Sveriges
Lantbruksuniversitet.Provtagning har gjorts på olika nivåer i bädden och vid olika tidpunkter. Med hjälp av analyser går det att identifiera förekomsten av bekämpningsmedel. Helt naturligt kan dessa påvisas
i ytskiktet i samband med rengöring av sprututrustningen. Senare analyser i underliggande lager visar inte på någon förekomst vilket visar att bädden fungerar på tänkt sätt. Spill i samband med påfyllning och rengöring har brutits ner av de mycket aktiva mikroorganismerna i blandningen av jord, halm och torv.
Enligt Lennart Torstensson är det speciellt viktigt att beakta följande: - När biobädden har sjunkit ca 1 dm bör ny halm / torv / jordblandning fyllas på. Detta görs lämpligen innan sprutsäsongen har börjat på våren. - Om grässkiktet har skadats mycket genom spill bör nya grästuvor läggas på de skadade fläckarna. Gräset bidrar till en bra miljö och aktivitet i bädden. - När sprutan inte används skall den parkeras på biobädden, såvida den inte förvaras under tak. När det regnar tvättas bekämpningsmedel av från utsidan av sprutan och dessa rester skall hamna i biobädden.
Ett alternativ till biobädden är att påfyllning och rengöring görs på en hårdgjord tät yta där spill och spolvatten kan samlas upp och behandlas. En metod är att föra det förorenade vattnet till
flytgödselbehållaren. Det är viktigt att det förorenade vattnet tillförs ytskiktet där den aeroba / syrerika miljön gynnar nedbrytningen av bekämpningsmedel. En annan metod är att samla upp det förorenade
vattnet från en tät yta och sprida det på en gräsyta eller annan mark med hög biologisk aktivitet.
Vår adress: ODLING I BALANS Tel/Fax: 042-32 10 05 Mobiltel 070-33 04 200
Description of the building of a closed biobed with reservoir for collection of percolateInformation for Dr. Heinz Ganzelmeier, BBA, (h.ganzelmeier@bba.de) 11th April 2003 Arne Helweg, Introduction: Some of the possibilities are:
Based on support from the Danish EPA a project was initiated in 2001. The scope was: The project is coordinated by Arne Helweg from DIAS and the following institutes are taking part in the project: Hardi International, COWI A/S and Farmers Advisory Service, Skejby. Testing of a biobed
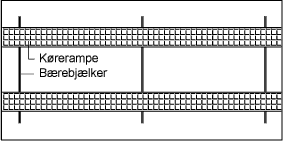
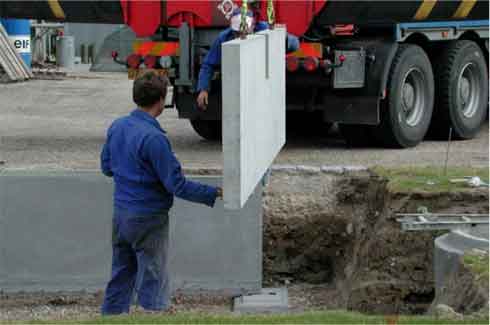
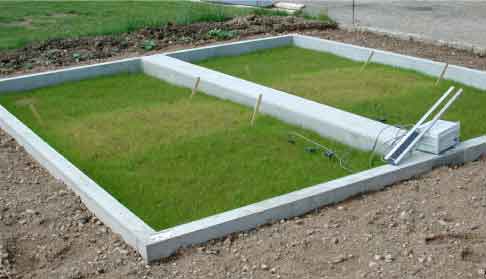
Professor Lennart Torstensson has been consultant in the building and the running of the experiment. Construction of the Biobed:The biobed was constructed in cooperation with Perstrup Beton Industri A/S, Boks 1, DK 8560 Kolind, contact: Flemming Bruun and Ole Borg (Telephone 86363200, Fax: 86363880) Drawing is shown on Figure 1 and Figure 2 shows the collection of the concrete walls for the biobed. Click here to see figure 1 Figure 2. Building of the frame for the biobed. An excavation was made for both biobed and reservoir (see right). The concrete sides were brought in place, and the bottom was closed by concrete.
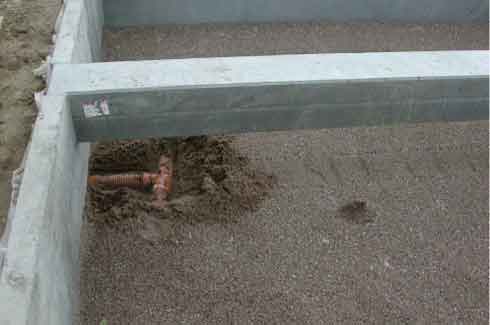
Filling of the biobed Figure 3. In the bottom of the closed biobed box, was a layer of 15 cm sand with a drain pipe connected to the reservoir with a possibility to close the drainage with a valve. On top of the sand was a 10 cm layer of clay compressed by walking on it.
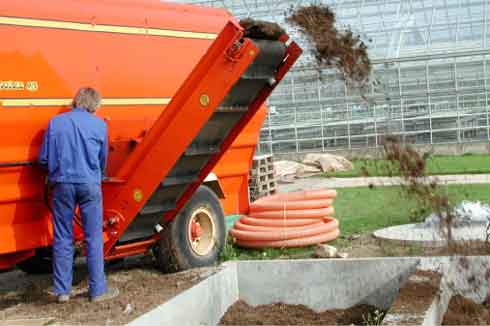
Figure 4. The biobed was filled with a mixture of chopped wheat straw (50%), sphagnum (25%) and soil from ploughlayer (25%). The mixing was performed in a feed mixer hired from a feedstuff business. Photo September 27th 2001. Roll grass was placed on November 2001
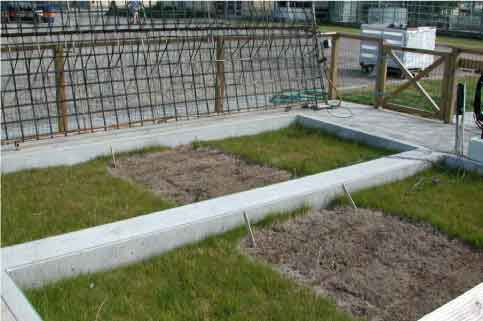
Treatment of the biobed Figure 5. To simulate spillage from filling and wasking, the biobed was treated between the yellow sticks with 21 pesticides watered out in a watering can (5g of each) in the spring and in the autumn 2002. First treatment May 13th. Photo showing initial damage May 24th
Figure 6. Clear pesticidedamage on the grass shown in august. The frame in the background is used to apply lack of water. To the right is shown electric cables collected to TDR probes to determine water content and instruments for temperature recording
References: Helweg, A., Bay, H., Hansen, H.P.B., Rabølle, M., Sonnenborg, A. and Stenvang, L. (2002) Pollution at and below sites used for mixing and loading of pesticides. Int. J. Environ. Anal. Chem., Vol. 82, No. 8-9, pp. 583-590
|
||||||||||||